


Getting Started
Quick Start
iToken provides one API key for the request formats published in our catalogue. If you've used the OpenAI SDK before, you're already 90% there — just change the base_url and API key.
1. Get an API Key
Sign in and create an API key from the Dashboard. Your keys start with sk-itk-.
You can view your full API key again in Dashboard → API Keys.
# Your API key — keep this secret
export ITK_API_KEY="sk-itk-your-key-here"
2. Find a Model ID
Open Pricing & models, find a model explicitly marked for Chat Completions for this quick start, then click the copy button below the model name. The exact Model ID is copied to your clipboard so you can paste it into the model field of your request.
3. Make your first request
Replace the base URL and you're good to go.
import os
from openai import OpenAI

client = OpenAI(
    base_url="https://itokenai.in/v1",
    api_key=os.environ["ITK_API_KEY"],
)

response = client.chat.completions.create(
    model="gpt-5.6-sol",
    messages=[{"role": "user", "content": "Hello, iToken!"}],
)

print(response.choices[0].message.content)
Getting Started
Supported Models
iToken supports the following request formats. Availability depends on the model: use the API format badges in Pricing & models to choose an exact model ID for your request format.
Image generation
Generate images from text, with reference images on supported models. Image support does not imply Chat Completions or Responses support.
Base URL: https://itokenai.in/v1
See Pricing & models for the complete current catalogue. Model IDs on this page are examples. You can also call GET /v1/models from your integration.
Getting Started
Codex / Responses Support
Codex uses OpenAI's Responses API. Do not assume that a model available through Chat Completions will also work in Codex.
Choose a model explicitly marked for the Responses API in the live catalogue.
If Codex reports an unsupported model or request format, check the Responses compatibility badge first, then confirm the model ID and the /v1 base URL.
Getting Started
Authentication
Use your API key in the Authorization header with the Bearer scheme.
API Key controls
Create a separate key for each application in the Dashboard. Model scope, spend limit, IPv4 / CIDR allowlist and expiration default to unlimited. You can create up to 10 keys; expired keys count toward the limit. Names may repeat. Model and IP allowlists each accept up to 256 entries; IPv6 is not supported.
Spend limits accept whole numbers from 1 to 9007199254 Credits. The 24px ring combines Used and Reserved; open it by hovering, keyboard focus or clicking for percentage, Limit, Used, Reserved, Available and Next reset. Unlimited keys have no ring. Spend usage loads separately: if it cannot be read, the ring shows — and Retry while key management remains available.
Spend limits are a usage safeguard, not a hard budget. Large requests or underestimated usage can cause significant overspend. Pending video tasks can block new requests for multiple days. Reserved credits are not settled spending. Ongoing calls reserve credits until settlement or release, including across daily resets.
Daily resets at 00:00 business time. Every 7 and 30 days use business time calendar-day windows. Enabling a period includes spending already recorded today. Changing periods carries the current used amount into the first new window; switching from Total may leave no available limit until the next window. Changing an amount within the same period does not reset spending. Total has no reset and counts recorded spending from this feature’s launch; historical spending is not backfilled.
Editing saves only the fields you change. Keep current preserves the existing expiration; a new duration starts when saved. You can rename an expired key and keep it expired, including if it expires while the dialog is open. To change other controls or reactivate it, choose an expiration or No expiration. Active describes availability, not remaining spend or balance. Calls with an expired key return “This API key has expired.”; deleted keys return “This API key has been deleted.” Both use HTTP 401 with invalid_api_key; other invalid keys use “The API key is not valid.” Account restrictions take priority.
Previously selected unavailable models may be kept or removed but cannot be called. A selected model that becomes unavailable before saving must be updated. A new Total limit below recorded spending is rejected with the minimum required. If a key expires while changing controls, choose an expiration. If spend limits are unavailable, try again after the service is updated. Failed saves keep your draft; if the result is unknown, refresh the key list to check before submitting again. The key and its selected controls save together. View reveals a key again; Delete requires typing its name and cannot be undone.
Authorization: Bearer sk-itk-your-key-hereNever expose your API key in client-side code or public repositories. Use environment variables or a secret manager.
Dashboard sign-in
Sign in to the Dashboard with an email verification code, Google, or GitHub. Dashboard sign-in is separate from API authentication: API requests always use your sk-itk- key.
API Reference
Chat Completions
The core inference endpoint. It follows OpenAI's /v1/chat/completions format; see Unsupported parameters for the fields iToken does not accept.
https://itokenai.in/v1/chat/completionsRequest body
{
  "model": "gpt-5.6-sol",
  "messages": [
    {"role": "system", "content": "You are a helpful assistant."},
    {"role": "user", "content": "Hello!"}
  ],
  "temperature": 1.0,
  "max_tokens": 1024,
  "stream": false
}
Parameters
| Parameter | Type | Description |
|---|---|---|
| model | string | Model ID, e.g. gpt-5.6-sol |
| messages | array | Conversation history |
| temperature | number | Passed to the model provider unchanged. |
| max_tokens | integer | Maximum output tokens, from 1 up to the model's limit. max_completion_tokens is also accepted; send only one of them. |
| stream | boolean | Stream via SSE. Default false |
| top_p | number | Nucleus sampling. Passed to the model provider unchanged. |
| stream_options | object | Set {"include_usage": true} to receive token usage and cost at the end of a stream. |
| tools | array | Function tools only (type: "function"). |
| n | integer | Only 1 is supported. |
Requests containing functions, function_call, audio, modalities, web_search_options, service_tier, prediction, store: true, an integer n other than 1, or tools whose type is not function are rejected with 400 unsupported_parameter. image_url parts require a model and an eligible provider that accept images, file parts one that accepts file input, and input_audio parts one that accepts audio input. A file part carries a PDF as a data:application/pdf;base64, URL in file_data; file_id is not accepted. Audio is sent as base64 in input_audio.data with input_audio.format; audio URLs are not accepted. A request can also be rejected when no eligible provider supports its combination of streaming, tools, images, files, audio and output limit. Invalid field types return invalid_parameter.
Streaming (SSE)
On models that support streaming, set stream: true to receive tokens as Server-Sent Events (data: {...} lines). A successful stream ends with data: [DONE]. To receive token usage and the settled cost, also send stream_options: {"include_usage": true}; the usage chunk arrives just before [DONE]. If the request ends in an error, the stream sends one data: {"error": {...}} event and ends without [DONE]. If valid final usage has already been obtained and remains valid, the request can still settle and end normally even if the provider subsequently fails or times out. After the streaming response starts, 15 seconds without output triggers a : keep-alive comment, which SDKs ignore.
Limits
Request bodies can be up to 32 MiB. Non-streaming requests have a 10-minute total limit. Streaming requests have a 60-minute total limit; upstream response headers must arrive within 10 minutes. These limits start when credits are reserved and are shared across provider attempts. The response-header limit is not a guarantee that the first content arrives within 10 minutes.
Response example
{
  "id": "req_example",
  "object": "chat.completion",
  "created": 1792627200,
  "model": "gpt-5.6-sol",
  "choices": [
    {
      "index": 0,
      "message": {
        "role": "assistant",
        "content": "Namaste!"
      },
      "finish_reason": "stop"
    }
  ],
  "usage": {
    "prompt_tokens": 20,
    "completion_tokens": 8,
    "total_tokens": 28,
    "cost": 0.0042,
    "cost_currency": "INR"
  }
}
Illustrative response only; the cost is not a price quote. usage.cost is the settled charge for this request in usage.cost_currency (INR for India, where 1 Credit = ₹1). It can include an amount owed; it is not a statement of cash collected. Token-detail objects are provider usage metadata, not itemised charges. Errors do not include cost fields.
API Reference
Image generation
Generate images using an Image model’s exact ID. Use reference images only where supported; image generation is a non-streaming request.
https://itokenai.in/v1/images/generationsUse your existing API key and JSON requests. Find currently callable models in Supported Models → Image generation. Request bodies are limited to 32 MiB; reference links must be accessible to the upstream provider.
Request parameters
| Parameter | Required / type | Behaviour |
|---|---|---|
model | Required · string | Exact callable Image model ID from the current catalogue; a text-only model cannot be used. |
prompt | Required · string | Non-empty text describing the image. Whitespace alone is not a prompt. |
n | Optional · integer | 1–10; default 1. Requested count is not a delivery guarantee. Some Seedream models return one image even when n is larger. Token-priced base64 models allow at most 5 at 1024×1024, or 3 for rectangular, omitted or auto sizes; check the model’s How to call guide. |
size | Optional · string | Accepted sizes vary by model. Models without size tiers forward the value unchanged. On size-tiered models the size you send selects the 1k or 2k output price before the request runs, and an unsupported value returns 400 unsupported_parameter; when omitted, the model default applies and is billed at its default tier. Token-priced models accept 1024x1024, 1024x1536, 1536x1024 or auto; omitted and auto values let the provider choose, with the largest applicable token estimate reserved. |
images | Optional · string or array | One HTTPS image URL or non-empty image data URL (data:image/…;base64,…), or an array of 1–16 of them. image is accepted as the same field; send only one of the two, or the request returns 400 with images as the parameter. Use a model that accepts reference images. |
watermark | Optional · boolean | Default false. Set true only on models that support watermarks. |
response_format | Optional · string | The model determines the return format. Omit this field, or use url for URL models and b64_json for base64 models. It cannot change a model’s return format. |
quality | Optional · string | Token-priced image models accept low, medium, high or auto. Omitted values stay omitted; omitted or auto uses the largest applicable estimate for reservation. Other models reject this field. |
output_format | Optional · string | Token-priced base64 models accept png, jpeg or webp. This selects the encoding, not a billing tier. Save the returned image with the matching extension. |
Extra top-level fields are rejected before generation with 400 unsupported_parameter. Do not send Chat parameters such as messages, stream or max_tokens. Model-specific capabilities may be narrower than the general field limits.
cURL
Set ITK_API_KEY as in Quick Start, then replace the model placeholder with an available Image model ID. The example requests one image and leaves model-specific options at their defaults.
# Copy an available Image model ID from Pricing & models first.
export ITK_IMAGE_MODEL="REPLACE_WITH_AVAILABLE_IMAGE_MODEL_ID"

curl https://itokenai.in/v1/images/generations \
  -H "Authorization: Bearer $ITK_API_KEY" \
  -H "Content-Type: application/json" \
  -d "{\"model\":\"$ITK_IMAGE_MODEL\",\"prompt\":\"A small orange boat on a calm lake\",\"n\":1}"
OpenAI SDK · Python
Install with pip install openai. Use the same environment variables as the cURL example. Automatic SDK retries are disabled to avoid repeating a paid generation after a connection failure or server error.
import base64
import os
from pathlib import Path
from openai import OpenAI

client = OpenAI(
    api_key=os.environ["ITK_API_KEY"],
    base_url="https://itokenai.in/v1",
    max_retries=0,  # Do not automatically repeat a paid generation.
)
result = client.images.generate(
    model=os.environ["ITK_IMAGE_MODEL"],
    prompt="A small orange boat on a calm lake",
    n=1,
)
for index, image in enumerate(result.data):
    if image.b64_json:
        # This example omits output_format, whose default encoding is PNG.
        Path(f"image-{index}.png").write_bytes(
            base64.b64decode(image.b64_json, validate=True)
        )
    else:
        print(image.url)  # Download promptly; see the URL example below.
# usage.cost is the settled charge; it is not an estimate.
print(result.to_dict().get("usage"))
Optional: reference images
Replace the example reference URL with your own accessible HTTPS image. For SDK extension fields, use extra_body. The currently supported token-priced base64 models do not accept reference images.
# Only use a model that accepts reference images.
result = client.images.generate(
    model=os.environ["ITK_IMAGE_MODEL"],
    prompt="Use the reference composition, with an orange boat",
    n=1,
    extra_body={"images": ["https://example.com/your-reference.png"]},
)
Response and saving images
{
  "created": 1793145600,
  "data": [{"url": "https://upstream.example/generated-image.png"}],
  "usage": {"cost": 1.20, "cost_currency": "INR"}
}
data[].url is an upstream image link. Download promptly: links expire after about 24 hours and are not stored or proxied by iToken. created comes from the upstream and may be null. usage.cost is the settled charge in usage.cost_currency (INR, 1 Credit = ₹1).
Some image hosts, including Grok links on imgen.x.ai, reject default headers from clients such as Python urllib. Use a common browser or curl User-Agent when downloading. Never send your iToken API key to the image host.
# Replace with a URL returned in data[].url; download before it expires.
curl --fail --location --user-agent "curl/8.0" \
  "https://upstream.example/generated-image.png" --output image.png
Base64 models return data[].b64_json instead of a URL. Decode and save it locally; iToken does not store the image. The Python example handles both forms. Omit response_format to use the model’s fixed format.
{
  "created": 1793145600,
  "data": [{"b64_json": "<base64 image data>"}],
  "usage": {"cost": 1.20, "cost_currency": "INR"}
}
Billing
Per-image models charge for the actual number of usable images delivered, not the requested n. Reference inputs are charged separately where the model has an input-image price. Partial success charges only for delivered images; if more images than requested are delivered, all delivered images are charged. An upstream error or no usable images means no generation charge.
Token-priced models charge the upstream’s reported input/output text and image tokens, with separate rates shown in Pricing & models. A partial result with at least one usable image is charged for the whole reported usage, without dividing by image count. Missing reliable usage or a response exceeding 32 MiB returns 502 upstream_error, releases the reservation and returns no images. A reservation is an estimate; the final charge can exceed it. Pixel-priced entries, when available, show a price per million billing pixels (MP), not per image; no pixel-priced model is currently declared.
No automatic generation retry is performed. Submitting again creates a new request and may incur another charge. A lost client connection does not cancel generation: check Usage before retrying.
Errors and recovery
Errors identify the affected parameter where applicable. No image data is included in an error response. See Error Codes for the shared error format.
| Problem | Recovery |
|---|---|
| Invalid JSON / body | Use a JSON object, not multipart or a second trailing JSON value. Invalid JSON returns 400 invalid_json; a body over 32 MiB returns 413 request_too_large. |
| Missing / invalid fields | Missing required values: 400 missing_parameter. Wrong types, null, a blank prompt, invalid reference URLs/data or n outside 1–10: 400 invalid_parameter. For response_format, any disallowed value or type instead returns 400 unsupported_parameter. Read error.param and correct that field. |
| Unsupported fields / capability | Unknown fields (including stream), unsupported references, watermarks or response format: 400 unsupported_parameter. Remove the field or choose a compatible model. |
| Model unavailable | Unknown, unavailable, text-only or unpriced image models: 404 model_not_found. Refresh the catalogue and choose an available Image model. |
| Authentication / balance | Invalid API key: 401; insufficient available credits: 402. Check your key or top up before retrying. |
| Upstream rejects / rate limits | Invalid upstream request: 400 upstream_invalid_request; upstream throttling: 429 upstream_rate_limited. Correct model-specific values or wait before making a new request. |
| No usable output / upstream failure | No valid delivered images: 502 upstream_error. Other connection, timeout and upstream failures follow Error Codes. Failed requests are not charged; do not treat a partial network response as delivered images. |
| Settlement not confirmed | A settlement that cannot be confirmed returns 503 without images. Check Usage before submitting a new request; it may create and charge for a second generation. |
| Download expired / denied | Expired links: check your previously saved copy; generation is a new paid request. For a download 403, try curl or a common browser User-Agent. A download failure after delivery does not automatically refund the generation. |
API Reference
Video generation
API Reference
Models List
Retrieve the list of available models. Compatible with OpenAI's /v1/models endpoint.
https://itokenai.in/v1/modelsRequires your API key. Query parameters are not accepted.
Response example
{
  "object": "list",
  "data": [
    {
      "id": "gpt-5.6-sol",
      "object": "model",
      "created": 1710000000,
      "owned_by": "itoken"
    },
    {
      "id": "claude-sonnet-5-5",
      "object": "model",
      "created": 1710000000,
      "owned_by": "itoken"
    },
    {
      "id": "deepseek-v4.1-flash",
      "object": "model",
      "created": 1710000000,
      "owned_by": "itoken"
    }
  ]
}
This list includes image models and does not distinguish Chat Completions, Responses or Image generation. Check the API format badges in Pricing & models. Using a model that supports only one protocol family with another returns 404 model_not_found.
API Reference
Error Codes
iToken uses standard HTTP status codes and returns JSON error bodies compatible with OpenAI's format.
{
  "error": {
    "message": "Send only one output limit.",
    "type": "invalid_request_error",
    "param": "max_tokens",
    "code": "invalid_parameter"
  }
}
Every response includes an X-iToken-Request-Id header. Include it when you contact support. Streaming error events use the same envelope; the HTTP status may already be 200.
| HTTP | Code | Description |
|---|---|---|
| 400 | invalid_json | The request body is not valid JSON, or is not a JSON object. |
| 400 | missing_parameter | A required field is missing. |
| 400 | invalid_parameter | A field has the wrong type or an out-of-range value. |
| 400 | unsupported_parameter | The request uses a parameter or combination iToken does not support. See Unsupported parameters. |
| 400 | upstream_invalid_request | The model provider rejected the request, for example because it exceeds the context length. The message explains what to change. |
| 401 | missing_api_key | No Authorization header, or it is not in the form Bearer <key>. On POST /v1/messages, also returned when neither Authorization nor x-api-key carries a usable credential, or when a credential header is repeated. |
| 401 | invalid_api_key | The key is not valid (“The API key is not valid.”), has expired (“This API key has expired.”) or has been deleted (“This API key has been deleted.”). You can rename an expired key without reactivating it; choose Expiration in Edit to reactivate it. Account restrictions take priority. |
| 402 | insufficient_balance | When your balance is positive but cannot cover the request reservation: This request requires ₹{required} in reserved credits, but only ₹{available} is currently available. Reduce your maximum output tokens or add more credits. If you have requests in progress, wait for them to finish and try again. The reservation is not the final charge. Adjust the output limit supported by your request format ( max_tokens, max_completion_tokens, or max_output_tokens); iToken does not lower it automatically.When your account balance is zero or negative: Your balance is insufficient. Please deposit more credits. |
| 404 | model_not_found | The model ID does not exist or is not available for this request format and its required capabilities. |
| 404 | route_not_found | The path does not exist. |
| 405 | method_not_allowed | The path exists but does not accept this HTTP method. |
| 413 | request_too_large | The request body is larger than 32 MiB, or the model provider rejected it as too large. |
| 429 | upstream_rate_limited | The model provider is rate limiting requests. If Retry-After is present, wait before retrying. |
| 500 | internal_error | An internal error occurred. Please retry or contact support with X-iToken-Request-Id. |
| 502 | upstream_error | The model provider returned an error or an invalid response. This error is not charged. |
| 503 | service_unavailable | iToken is temporarily unavailable. Retry later. |
| 503 | exchange_rate_missing | Pricing is temporarily unavailable. Retry later. |
| 504 | upstream_timeout | The request reached its total time limit (10 minutes without streaming, 60 minutes with streaming), or the model provider timed out. This error is not charged. |
API Reference
Providers & Routing
A model can have several providers with different rates. Open its page from Pricing & models to see each one in the Providers table. The catalogue and model pricing show the full set of rates from the provider with the lowest average across published Input, Output and cache base rates. This presentation reference does not change provider routing or billing.
How requests are routed
Each request uses a price-weighted random choice: cheaper providers are more likely to serve it. Latency, throughput and uptime are not routing inputs. Recently failing providers are tried last.
A request is sent only to providers supporting its streaming, tools, image input and output limit requirements. For both Chat and Responses, model-level checks run first. Requesting streaming or tools that the model does not support returns 404 model_not_found. An output limit above the model maximum returns 400 invalid_parameter. Unsupported image input returns 400 unsupported_parameter.
After model-level checks pass, if each requirement is supported individually but no single provider supports their combination, the request returns 400 unsupported_parameter. Context window is not a selection criterion: the model header shows the largest provider window, and the selected provider can reject a request exceeding its own window.
A request can try at most three providers, switching only before the first output. Switching can follow a connection failure, provider throttling or temporary unavailability, a rejection caused by a platform-side issue, or a transport failure before output. A streaming request that receives no response headers, or no bytes after headers, for 60 seconds can also switch when another healthy provider and enough time remain. Provider error frames and failure results do not trigger a switch.
Rates and balance
Each request is billed at the rates of the provider that actually serves it; failed attempts are not charged. The provider that served a request is shown in the call details on the Usage page. Before starting, iToken reserves the highest amount required by any candidate provider. A balance sufficient only for a cheaper provider can still result in 402 insufficient_balance.
Chat cache affinity
Later Chat requests for the same account, model and conversation usually return to the same provider when it is available and its cache read rate is lower than its input rate. Affinity expires after 10 minutes of inactivity. It is best effort: each service instance keeps its own affinity records, so returning to the same provider is not guaranteed.
The conversation is identified first by a nonempty session_id in the request body, then by the x-session-id request header, then by a nonempty prompt_cache_key. Otherwise, it uses the first system or developer message together with the first other message. The session_id field and session headers are not forwarded to providers; prompt_cache_key is forwarded unchanged.
Responses and provider identity
Responses always uses affinity for the same account, model and conversation, regardless of cache rates. It follows the same identity order, with the session-id header checked after x-session-id and before prompt_cache_key. Otherwise, it uses instructions together with the first input item, or the input string. Affinity expires after 10 minutes of inactivity and is best effort: each service instance keeps its own records, so returning to the same provider is not guaranteed.
Responses can be supplied by multiple providers. Conversation affinity tries to return to the same provider. If a provider rejects encrypted reasoning from another provider, the request can retry once on the rejecting provider with the encrypted reasoning removed and its summary preserved. Requests containing compact history are not retried this way; compact history can continue only on the original provider. API responses contain no provider identifier field or header.
How To Use
Use iToken with CLI Agents
Use an agent that lets you configure a custom OpenAI-compatible provider. You need an iToken API key, the API base URL, and an available model that supports the agent's request format.
Tools with documented custom endpoints: Hermes Agent, Cline, Kilo Code, pi, omp, OpenClaw, DeepSeek Harness, Janitor AI, OpenHands, ZCode, Zed Editor, Strix, SillyTavern, Zoo Code, OpenMed Agent, claude-mem, CodeGPT, Open WebUI, and HammerAI.
This list is not exhaustive, and we have not tested every tool in it.
1. Create an iToken API Key
- Open the Dashboard and sign in with email, Google, or GitHub.
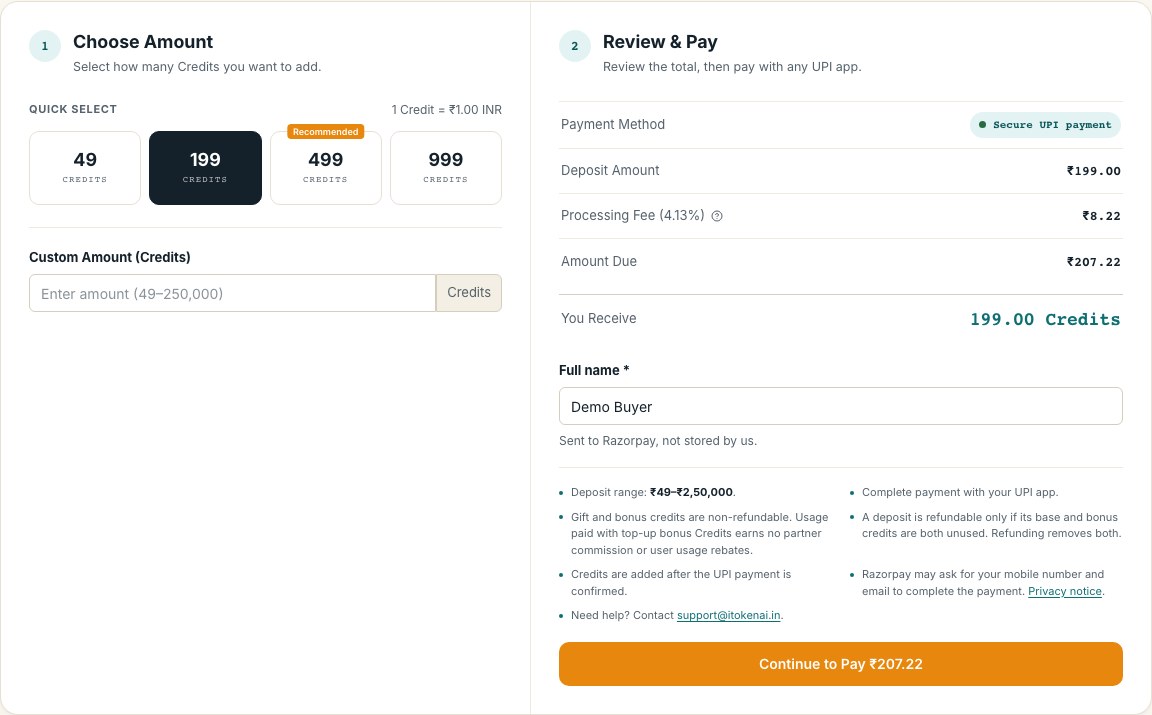
- Check your balance before sending requests. Top up with Razorpay UPI in INR if needed. You can create a key before topping up.
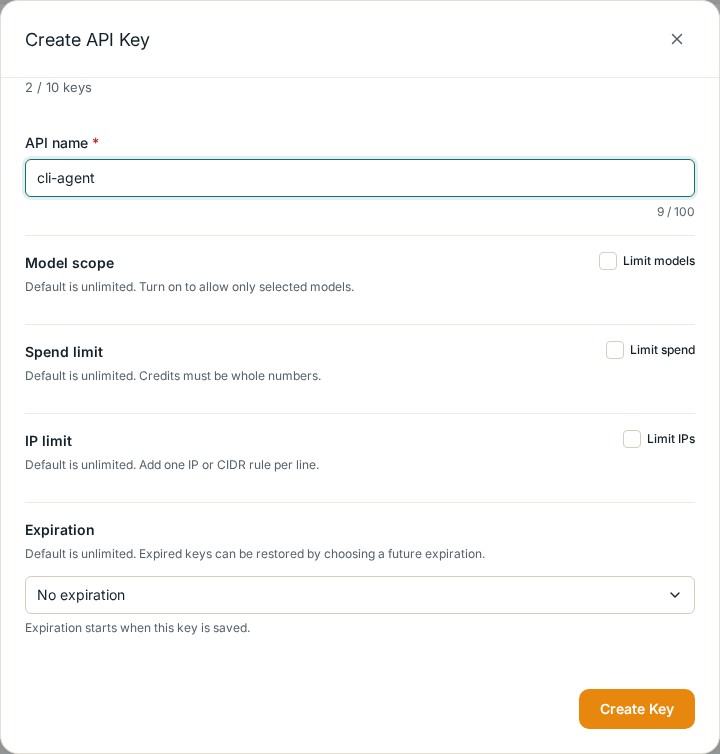
- In Dashboard → API Keys, select Create API Key.
- Enter a recognizable API name, such as
cli-agent, then configure Model scope, Spend limit, IP limit and Expiration if needed. All default to unlimited. Select Create Key. - Copy the generated
sk-itk-...key, then select Done. To view it again, open the key's Actions → View menu in Dashboard → API Keys.
Keep the key private. Store it in the agent's credential setting or an environment variable, and keep it out of shared configuration files.
Screenshots use sample account data.

2. Add iToken as a Custom Provider
https://itokenai.in/v1sk-itk-... keyThe base URL already ends in /v1. Do not append another /v1 or the request path unless the tool explicitly asks for a full endpoint. Janitor AI and CodeGPT ask for the completion endpoint: https://itokenai.in/v1/chat/completions. Follow each linked provider guide; some custom-provider settings require a paid plan.
3. Save and Test the Agent
Start a new conversation and ask for a short reply. Check the API key, base URL, protocol and model ID if it fails. A model listed by /v1/models is not necessarily available through both protocols; check Supported Models.
A 402 insufficient_balance can mean the balance cannot cover the request's output reservation. Start with a small output limit where supported, or choose a less expensive model.
How To Use
How to Use Codex with iToken API
Configure Codex CLI directly with a custom provider. Use a model listed in Codex / Responses Support. An iToken key authenticates this provider; no OpenAI account login or local proxy is required for this CLI setup.
1. Install Codex CLI
Follow the official installation instructions, then run codex --version.
2. Get Your iToken API Key
- Open the Dashboard and sign in.
- Make sure your account has a balance before sending requests. Use Top up when available.
- Select Create API Key, give it a recognizable name such as
codex, and copy yoursk-itk-...key.
You can view your full API key again in Dashboard → API Keys. Keep it private and out of shared configuration files.
3. Configure the iToken Provider
Set ITK_API_KEY in your shell using your key. Edit ~/.codex/config.toml, preserving unrelated settings. Put the top-level model settings before the provider table, and replace RESPONSES_MODEL_ID with an available Responses model's exact ID.
https://itokenai.in/v1responsessk-itk-... key, in ITK_API_KEYmodel_provider = "itoken"
model = "RESPONSES_MODEL_ID"
[model_providers.itoken]
name = "iToken"
base_url = "https://itokenai.in/v1"
env_key = "ITK_API_KEY"
wire_api = "responses"See the official authentication guide for custom-provider credentials. Do not put your key in the TOML file.
4. Run a Short Test
Open a terminal with ITK_API_KEY available, start a fresh session, and check that Codex returns ITOKEN_DOCS_OK.
codex exec --skip-git-repo-check --sandbox read-only --ephemeral "Reply exactly ITOKEN_DOCS_OK. Do not use tools or read any files."If Codex warns that the model is unknown, check the exact ID and the live Responses list. If it returns 402 insufficient_balance, use a model whose output reservation your balance can cover.
Migrate Codex Session History
If you use an official OpenAI subscription (ChatGPT login) alongside iToken, CC Switch's Unified Codex session history switch (v3.16.x+) merges both into one resume list, and can optionally migrate your existing official sessions in, with an automatic backup before anything is rewritten. Here is what happens when you enable it, step by step. Adapted from the CC Switch guide.
Step 1: Find the switch
Go to Settings → General → Codex App Enhancements. That block has two rows of switches; the second row (the blue history icon) is the subject of this guide:
When enabled, the official subscription runs under the shared "custom" provider id so official and third-party sessions appear in one history list, optionally migrating existing official sessions in (backed up first). When turning it off, the migrated sessions can be restored from backup. Note: resuming an old session across providers may fail because its encrypted_content reasoning can only be decrypted by the backend that created it.
This description previews three things: sessions will appear in one list, you can optionally migrate them in with an automatic backup, and resuming across providers "may fail." Here, "fail" means you can't resume / can't generate a new turn, not "the record is lost."
Step 2: Flip the switch from off to on → a confirmation dialog pops up
The moment you flip the switch on, CC Switch does not save immediately; instead it first pops up a confirmation dialog. The dialog text reads as follows:
- Title: Unified Codex session history
- Body: When enabled, the official subscription and third-party providers share one session history list. Note: resuming an old session across providers may fail because its encrypted_content reasoning cannot be decrypted by another backend.
- You can also migrate your existing official session history into the shared list (originals are backed up to
~/.cc-switch/backupsfirst and can be restored when you turn this off). - Checkbox: Also migrate existing official session history
- Confirm button: I understand, enable
- Cancel button: Cancel
The checkbox is unchecked by default - an important fork in the road:
custom shared list.Official sessions from before enabling keep the openai tag and stay exactly where they were, in ~/.codex/sessions/.custom; the original data is covered by the backup.If you want your earlier official sessions in the unified list too, you must opt in by checking the box - otherwise they simply stay in the original list (not lost, just not shown while you're on the shared one). Clicking Cancel or outside the dialog flips the switch straight back to off and nothing happens.
Step 3 (only if you checked migration): how migration runs + data safety
If you check "Also migrate existing official session history", CC Switch runs this procedure on your existing official sessions:
For each official (openai tag) session file:
  1. Copy the original file untouched into the backup directory
     <- data now has its first safety net
  2. Using "write a temp file -> replace the whole thing" atomic style,
     change only the model_provider in the session_meta header line
     from "openai" to "custom"  <- conversation body untouched
  3. Update the index database state_5.sqlite in the same transaction
Backup location: ~/.cc-switch/backups/codex-official-history-unify-v1/<timestamp>/ - one timestamped generation directory per migration, containing jsonl/ (session copies), state/ (index DB copy), and meta.json.
What's changed: only the value of the single model_provider field. Your conversation content, reasoning content, and all body text are kept exactly as is.
What's deleted: nothing. The backup is a copy and the rewrite is an atomic replacement of the same file - at no point is any session or index deleted.
Enabling and migration do not pop a success toast. Migration runs as a background task while the configuration is saved; in the UI you will only see the switch turn on. Not seeing a "migration succeeded" popup is normal and does not mean failure.
For the disable/restore flow, symptom reference, and manual verification commands, see the detailed guide on GitHub.
How To Use
How to Use OpenClaw with iToken API
Configure OpenClaw with a custom provider before connecting messaging channels. The local test below does not require a gateway daemon or a channel login.
1. Install OpenClaw
Follow the official installation instructions, including its Node.js requirements. Check openclaw --version.
2. Get Your iToken API Key
- Open the Dashboard and sign in.
- Make sure your account has a balance before sending requests. Use Top up when available.
- Select Create API Key, give it a recognizable name such as
openclaw, and copy yoursk-itk-...key.
You can view your full API key again in Dashboard → API Keys. Keep it private and out of shared configuration files.
3. Configure OpenClaw
Set ITK_API_KEY in your shell. Merge this into ~/.openclaw/openclaw.json; preserve existing settings. Replace both occurrences of CHAT_MODEL_ID with an exact ID from the Chat Completions list.
https://itokenai.in/v1openai-completionssk-itk-... key, in ITK_API_KEY{
"agents": {
"defaults": { "model": { "primary": "itoken/CHAT_MODEL_ID" } }
},
"models": {
"providers": {
"itoken": {
"baseUrl": "https://itokenai.in/v1",
"apiKey": "${ITK_API_KEY}",
"api": "openai-completions",
"models": [
{ "id": "CHAT_MODEL_ID", "name": "iToken model", "maxTokens": 256 }
]
}
}
}
}The custom-provider reference explains the provider/model prefix and environment substitution. The small maxTokens value is for the connection test; raise it within the model's limit for normal work.
Some GPT models reject tools with reasoning parameters through Chat Completions. Use a compatible Chat model for this configuration, or configure openai-responses with a model from the Responses list instead.
4. Test Locally
Run this in an empty test directory. Look for ITOKEN_DOCS_OK before setting up channels.
openclaw agent exec "Reply exactly ITOKEN_DOCS_OK. Do not use tools or read any files." --thinking off --timeout 90How To Use
How to Use Hermes with iToken API
Point Hermes Agent CLI at iToken as a custom OpenAI-compatible endpoint.
1. Install Hermes
Follow the official installation instructions. Check hermes --version.
2. Get Your iToken API Key
- Open the Dashboard and sign in.
- Make sure your account has a balance before sending requests. Use Top up when available.
- Select Create API Key, give it a recognizable name such as
hermes, and copy yoursk-itk-...key.
You can view your full API key again in Dashboard → API Keys. Keep it private and out of shared configuration files.
3. Configure the Custom Endpoint
Set ITK_API_KEY in your shell. Merge this into ~/.hermes/config.yaml, replacing CHAT_MODEL_ID with an exact ID from the Chat Completions list. Keep unrelated settings.
https://itokenai.in/v1custom (Chat Completions)sk-itk-... key, in ITK_API_KEYmodel:
default: CHAT_MODEL_ID
provider: custom
base_url: https://itokenai.in/v1
key_env: ITK_API_KEY
agent:
reasoning_effort: nonekey_env names the environment variable; it is not the key itself. See the official provider guide. You can also use hermes model and choose a custom endpoint.
4. Send a Test Prompt
Run this from an empty test directory with the key environment variable available. Confirm the reply is ITOKEN_DOCS_OK, then start an interactive session with hermes.
hermes chat --oneshot --max-turns 1 --run-budget 60 --reasoning none -q "Reply exactly ITOKEN_DOCS_OK. Do not use tools or read any files."How To Use
How to Use DeepSeek Harness with iToken API
Add iToken to DeepSeek Harness's web interface as a custom model API. This configuration uses Responses.
1. Open DeepSeek Harness
Follow the official installation instructions, then open its local web interface:
npx @deepseek-ai/dsh webIf initial setup asks for a DeepSeek official key, choose to configure it later. Your iToken key belongs in the custom provider below.
2. Get Your iToken API Key
- Open the Dashboard and sign in.
- Make sure your account has a balance before sending requests. Use Top up when available.
- Select Create API Key, give it a recognizable name such as
deepseek-harness, and copy yoursk-itk-...key.
You can view your full API key again in Dashboard → API Keys. Keep it private and out of shared configuration files.
3. Add a Custom Model API
- Open the account menu → Settings → Models → Add model provider.
- Choose Custom model API and fill in these fields.
itokeniTokenhttps://itokenai.in/v1openai-responses)sk-itk-... key- Click Add model and enter an exact model ID from Codex / Responses Support. Give it a display name.
- In the model options, set the maximum output tokens to
256for the connection test. Raise this within the model's limit for normal use. - Click Create provider and wait until iToken shows that its key is configured.
If you use Fetch available models, confirm the selected IDs support Responses before updating the list and saving the provider. Fetching IDs alone does not select the right protocol. See the official provider guide.
4. Select a Workspace and Test
Close Settings and create a new conversation. Select a workspace (the default workspace is sufficient for a short test), then select your saved iToken model in the composer. Send Reply exactly ITOKEN_DOCS_OK. Do not use tools or read any files. and check the response.
Use a new conversation after changing the provider's protocol. The Responses selection avoids Chat-specific restrictions on GPT reasoning and tools.
How To Use
How to Use WorkBuddy with iToken API
Configure WorkBuddy's custom model settings with an OpenAI-compatible Chat Completions endpoint.
1. Install WorkBuddy
Download the desktop app from workbuddy.ai. Check the installed version in its settings.
2. Get Your iToken API Key
- Open the Dashboard and sign in.
- Make sure your account has a balance before sending requests. Use Top up when available.
- Select Create API Key, give it a recognizable name such as
workbuddy, and copy yoursk-itk-...key.
You can view your full API key again in Dashboard → API Keys. Keep it private and out of shared configuration files.
3. Add iToken as a Custom Model
- Open Settings → Model, then add a model.
- In the Provider (OpenAI-compatible API only) dropdown, select Custom, then fill in these fields.
https://itokenai.in/v1sk-itk-... keyWith Custom Protocol off, WorkBuddy adds the standard /chat/completions path. Enter the base URL ending in /v1. For the connection test, leave Input and Output at Use provider default, then click Save. See the official model configuration guide.
4. Select the Saved Model and Test
Start a new chat, open the model selector, and scroll down within the model list to select your saved model in the custom model group. Send Reply exactly ITOKEN_DOCS_OK. Do not use tools or read any files. and confirm the reply. If the model rejects reasoning or tool parameters, select a compatible Chat Completions model and start a new chat.
SDKs
SDK Examples
iToken works with any HTTP client, but these examples use the official OpenAI SDKs for maximum convenience.
Python
import os
from openai import OpenAI

client = OpenAI(
    base_url="https://itokenai.in/v1",
    api_key=os.environ["ITK_API_KEY"],
)

response = client.chat.completions.create(
    model="gpt-5.6-sol",
    messages=[{"role": "user", "content": "Hello!"}],
)

print(response.choices[0].message.content)
Node.js
import OpenAI from "openai";

const client = new OpenAI({
  baseURL: "https://itokenai.in/v1",
  apiKey: process.env.ITK_API_KEY,
});

const response = await client.chat.completions.create({
  model: "gpt-5.6-sol",
  messages: [{ role: "user", content: "Hello!" }],
});

console.log(response.choices[0].message.content);
cURL
curl https://itokenai.in/v1/chat/completions \
  -H "Content-Type: application/json" \
  -H "Authorization: Bearer $ITK_API_KEY" \
  -d '{
    "model": "gpt-5.6-sol",
    "messages": [{"role": "user", "content": "Hello!"}]
  }'